Introduction to No-Bake Twix Cheesecake
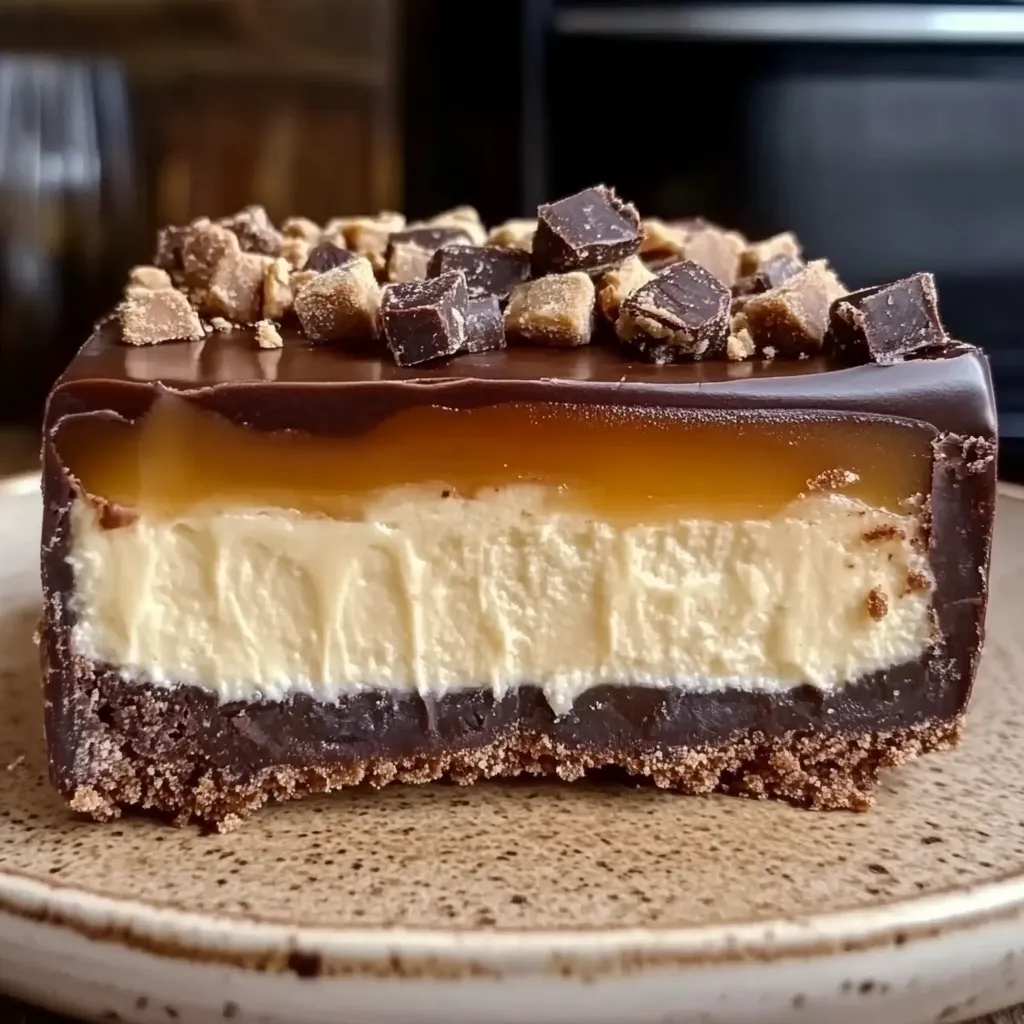
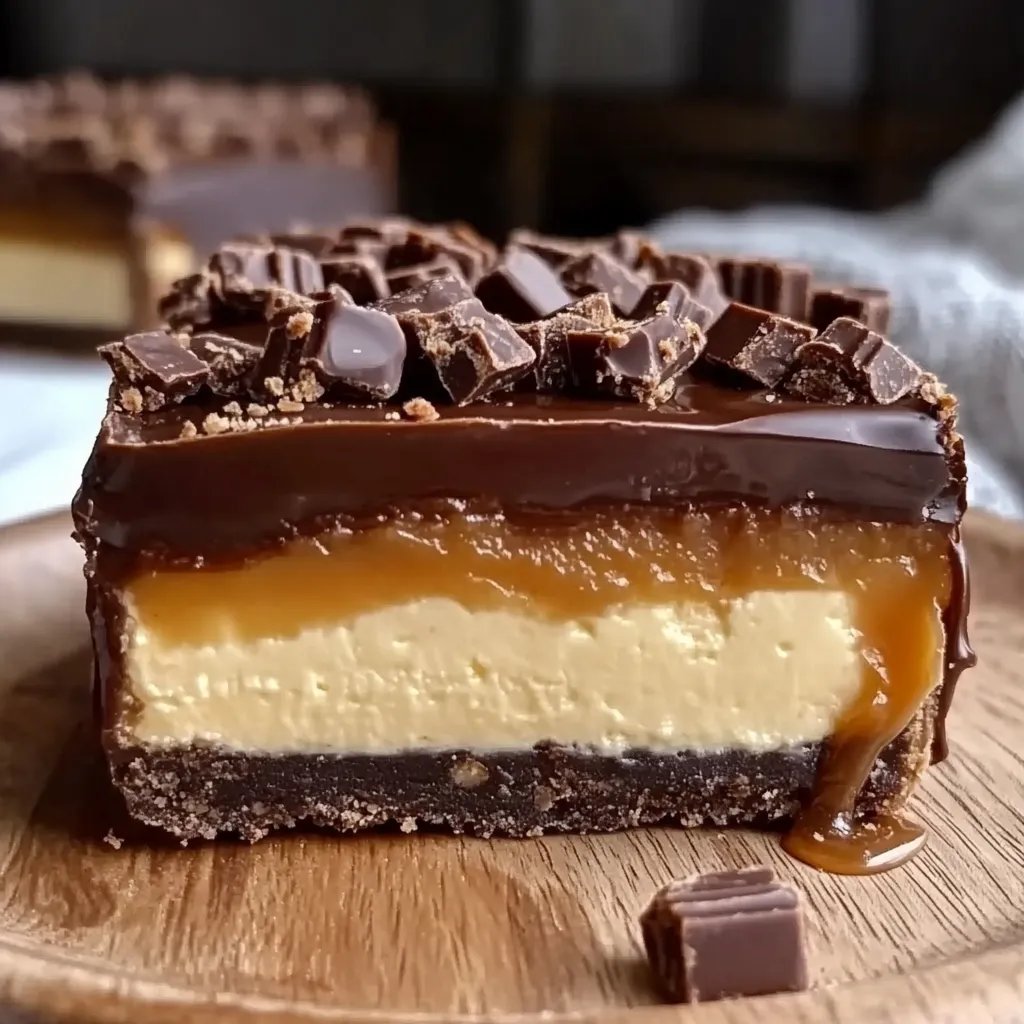
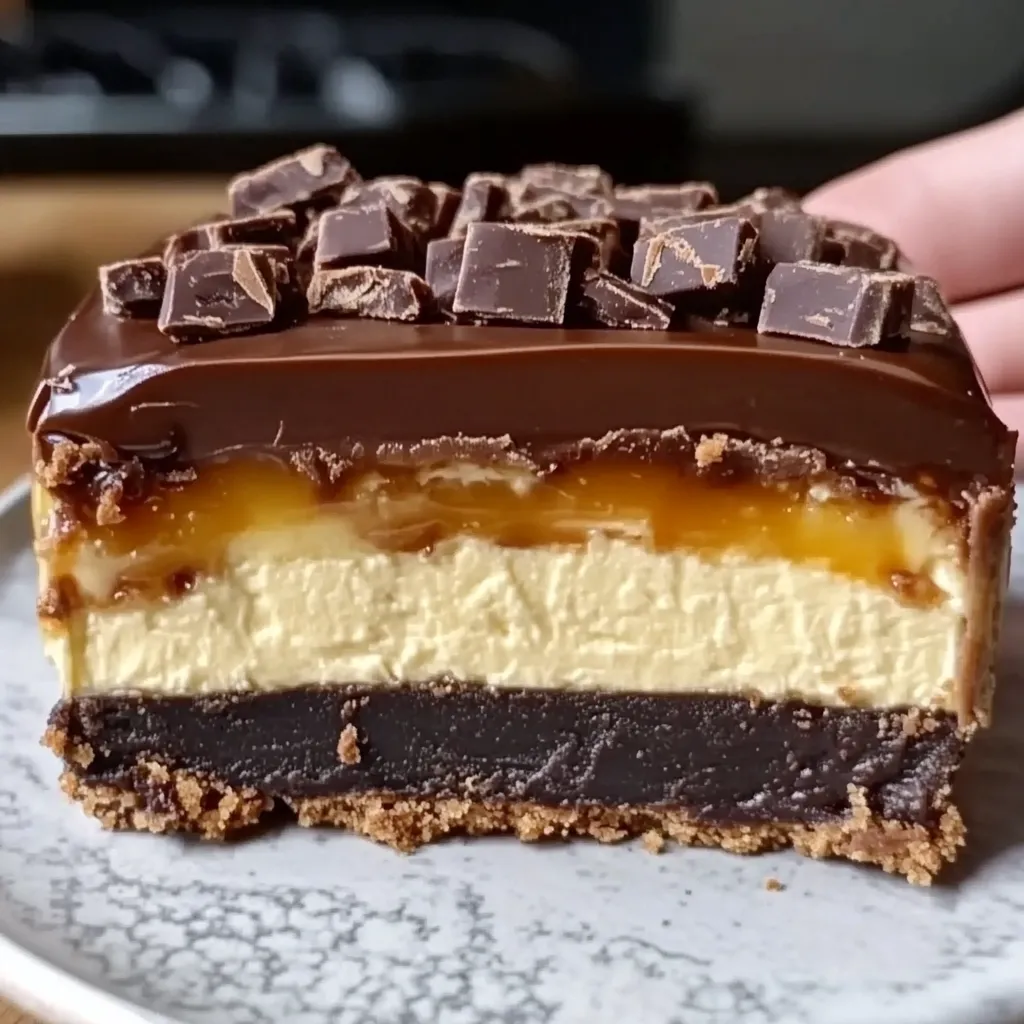
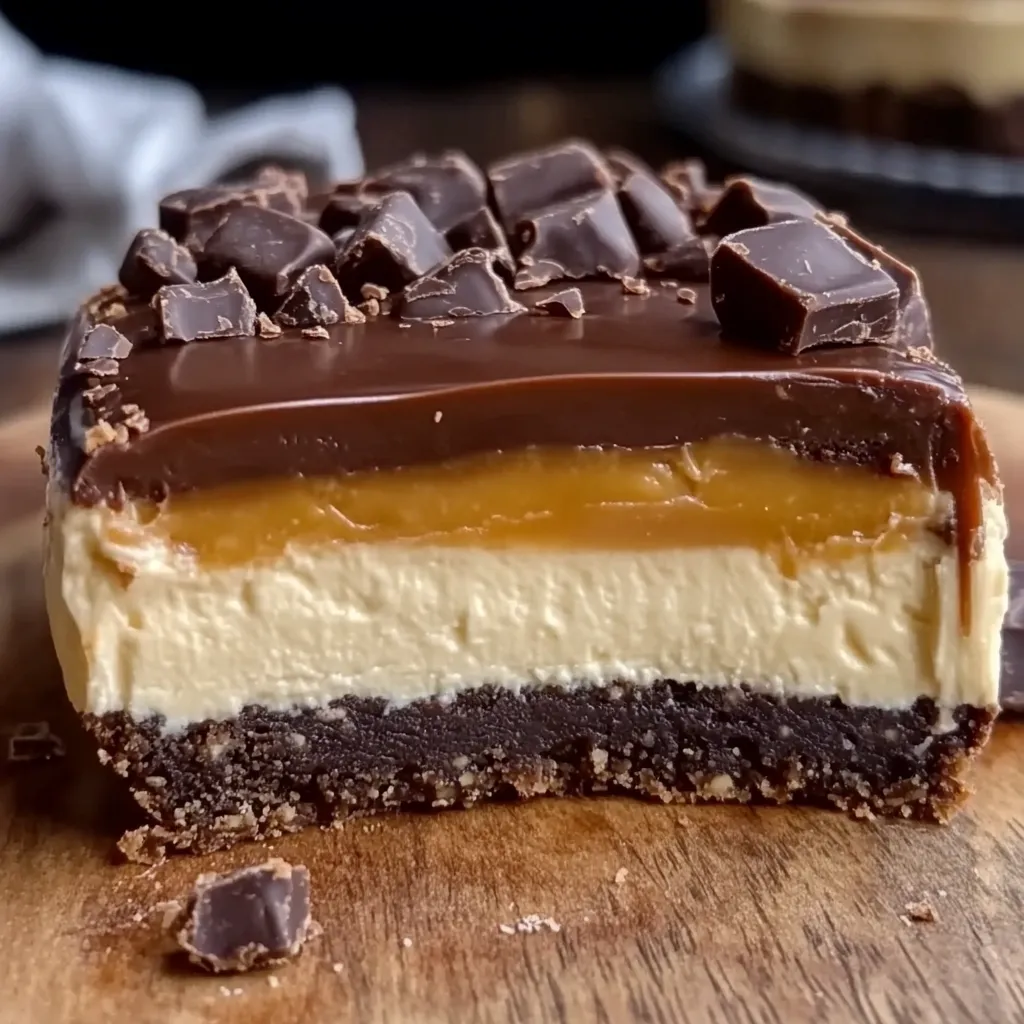
If you love Twix bars and cheesecake, you’re in for a treat. A No-Bake Twix Cheesecake combines the best of both worlds—without needing an oven. This indulgent dessert features layers of buttery graham cracker crust, smooth chocolate, creamy cheesecake, rich caramel, and a final chocolate drizzle. It’s everything you love about the classic candy bar, transformed into a decadent, no-fuss dessert.
For more no-bake inspiration, check out this Classic Cherry Delight Recipe – A Timeless No-Bake Dessert, another effortless dessert that’s perfect for any event.
Why This No-Bake Version is Perfect for All Skill Levels
Many traditional cheesecakes require a water bath, careful baking times, and cooling processes to avoid cracks. But with a no-bake cheesecake, all of that hassle disappears. This recipe is ideal for:
- Beginners: No complicated baking techniques required.
- Busy Home Cooks: Quick to prepare, with minimal hands-on time.
- Warm Weather Desserts: No need to heat up the kitchen.
Plus, no-bake cheesecakes set in the fridge, making them a stress-free option for parties and gatherings.
If you’re new to making ganache, you might want to check out this guide on how to melt chocolate properly from Serious Eats. It will ensure your chocolate layer is smooth and glossy without seizing or burning. If you’re looking for more quick no-bake treats, this White Chocolate Cranberry Pecan Clusters – Easy No-Bake Treat is another great option for sweet lovers.
The Appeal of Layering Flavors
One of the reasons this No-Bake Twix Cheesecake is so irresistible is the way each layer builds upon the next, creating the ultimate dessert experience.
- Graham Cracker Crust: Adds a crunchy, slightly salty base that complements the sweet layers.
- Silky Chocolate Layer: A rich, velvety addition that sets the stage for the cheesecake filling.
- Creamy Cheesecake Filling: Light, fluffy, and perfectly balanced between sweet and tangy.
- Smooth Caramel Layer: Brings a buttery sweetness with a hint of saltiness.
- Final Chocolate Drizzle: The perfect finishing touch, making it look just as good as it tastes.
When making whipped cream for the filling, using high-quality whipping cream makes all the difference. Here’s a useful resource on choosing the best whipping cream for desserts from Food Network.
Unlike other Twix-inspired desserts, this no-bake cheesecake keeps the integrity of the classic candy bar while elevating it into a show-stopping dessert. Whether you’re making it for a birthday, holiday, or just because, this easy cheesecake recipe is sure to impress.
Why You’ll Love This Recipe
If you’re looking for a dessert that’s effortless yet impressive, this No-Bake Twix Cheesecake is the answer. Whether you’re a seasoned baker or just starting out, this recipe is simple to follow and delivers incredible flavor with minimal effort.
No Oven Required
One of the biggest perks of this recipe is that it’s completely no-bake. There’s no need to worry about preheating, overcooking, or cracks forming in the cheesecake. Instead, it sets perfectly in the fridge, giving you a stress-free way to make a delicious homemade dessert.
Perfect for Any Occasion
This Twix-inspired cheesecake is a guaranteed crowd-pleaser, making it ideal for:
- Special occasions: Birthdays, holidays, and celebrations.
- Casual gatherings: Impress guests at potlucks or dinner parties.
- Weekend indulgence: A fun, easy treat to enjoy at home.
If you want to make it ahead of time, this guide on how to store cheesecakes from Food Network will help you keep it fresh and creamy.
Customizable & Easy to Modify
One of the best things about this recipe is its flexibility. You can:
- Swap the graham cracker crust for Oreo cookies or shortbread.
- Use dark chocolate, milk chocolate, or even white chocolate for the ganache.
- Add chopped Twix bars on top for extra crunch.
- Try a salted caramel version by using this homemade caramel sauce recipe from Allrecipes.
No matter how you customize it, this No-Bake Twix Cheesecake will always be rich, creamy, and completely irresistible.
Ingredients & Substitutes
Every ingredient in this No-Bake Twix Cheesecake plays a crucial role in creating the perfect balance of flavors and textures. Below is a breakdown of each component, along with substitutes for dietary needs and recommended brands for the best results.
Key Ingredients & Their Purpose
- Graham Cracker Crumbs (2 cups) – Forms the crispy, slightly sweet crust. You can crush whole crackers or use pre-made crumbs.
- Melted Butter (½ cup) – Binds the crust together and adds richness.
- Chocolate Chips (1 cup) – Creates a smooth, velvety chocolate layer that mimics the chocolate coating of a Twix bar.
- Heavy Cream (½ cup) – Helps melt the chocolate into a glossy ganache.
- Cream Cheese (2 cups, softened) – The heart of the cheesecake, giving it a rich, creamy texture.
- Powdered Sugar (½ cup) – Sweetens the filling while keeping it smooth.
- Vanilla Extract (1 tsp) – Enhances the flavor and balances the sweetness.
- Caramel Sauce (1 cup) – Adds a buttery, sweet contrast to the cheesecake.
- Whipped Cream (1 cup, folded in) – Creates a lighter, airier texture in the filling.
If you’re making homemade caramel, check out this easy caramel sauce recipe from Allrecipes for the best results.
Dietary Substitutions
- Gluten-Free Crust – Swap graham crackers for gluten-free cookies or use crushed nuts with a little melted butter.
- Dairy-Free Option – Use vegan cream cheese (like Daiya or Kite Hill), coconut cream instead of heavy cream, and dairy-free chocolate chips.
- Lower-Sugar Version – Replace powdered sugar with a sugar-free alternative like monk fruit sweetener.
Recommended Brands for the Best Taste
- Graham Crackers: Honey Maid or Annie’s (for a natural option).
- Chocolate Chips: Ghirardelli or Guittard for a richer, smoother melt.
- Cream Cheese: Philadelphia for the best creamy texture.
- Caramel Sauce: Homemade is best, but Smucker’s or Torani are good store-bought options.
For an ultra-smooth chocolate layer, check out this guide on how to melt chocolate properly from Serious Eats. Using the right technique ensures a silky, lump-free ganache that spreads easily over the crust.
With these ingredients and options, this No-Bake Twix Cheesecake is easy to adapt while keeping all the rich, indulgent flavors you love.
Kitchen Tools & Equipment Needed
Making a No-Bake Twix Cheesecake doesn’t require fancy equipment, but having the right tools will make the process easier and more efficient.
Essential Tools for the Best Results
To ensure your cheesecake layers come together smoothly, you’ll need:
- Mixing Bowls: For combining the crust, cheesecake filling, and chocolate layers.
- Electric Mixer: A hand or stand mixer helps achieve a light and fluffy cheesecake filling.
- Springform Pan: The best choice for no-bake cheesecakes, making it easy to remove and slice.
If you don’t have a springform pan, you can use a deep dish pie pan or a lined cake pan. Just be sure to line it with parchment paper to make removal easier.
For smooth chocolate layers, follow these expert tips on melting chocolate properly from Serious Eats. This ensures a glossy, lump-free ganache for the perfect drizzle.
Helpful Kitchen Tips for a Smooth Process
- Room Temperature Ingredients: Let cream cheese soften for a silky texture.
- Chilling Time Matters: The longer the cheesecake chills, the better the texture.
- Even Crust Layer: Press the graham cracker crust firmly to prevent crumbling when slicing.
For an ultra-creamy filling, check out this guide to choosing the best whipping cream from Food Network. Using high-quality cream makes all the difference in achieving a smooth and airy consistency.
Step-by-Step Instructions for No-Bake Twix Cheesecake
This No-Bake Twix Cheesecake is all about perfectly balanced layers of crunchy crust, silky chocolate, creamy cheesecake, rich caramel, and a decadent drizzle. Follow these step-by-step instructions to ensure a flawless dessert every time.
1. Making the Crust
A sturdy graham cracker crust is essential for holding the layers together.
How to Mix and Press the Crust for the Best Texture
- Combine 2 cups of graham cracker crumbs with ½ cup melted butter until the texture resembles damp sand.
- Press the mixture firmly into a springform pan, using the back of a spoon or a flat-bottomed glass for even compression.
Tips to Prevent Crumbling When Slicing
- Ensure the crust is packed tightly to prevent it from falling apart when cutting.
- Let the crust chill in the fridge for at least 10 minutes before adding the next layer.
2. Preparing the Chocolate Layer
A smooth chocolate ganache adds richness and structure between the crust and cheesecake.
How to Melt Chocolate Properly to Avoid Burning
- Combine 1 cup of chocolate chips with ½ cup heavy cream in a microwave-safe bowl.
- Heat in 20-second intervals, stirring in between, until smooth and fully melted.
- For a perfect texture, follow these expert chocolate melting tips from Serious Eats.
How to Spread Evenly for a Glossy Layer
- Pour the melted chocolate over the chilled crust.
- Use a spatula to spread it evenly.
- Return to the fridge for 15-20 minutes to firm up before adding the cheesecake filling.
3. Making the Cheesecake Filling
The cheesecake layer should be light, creamy, and fluffy.
Tips for Achieving the Creamiest Consistency
- Beat 2 cups of softened cream cheese with ½ cup powdered sugar and 1 teaspoon vanilla extract until smooth and lump-free.
- In a separate bowl, whip 1 cup of heavy cream until stiff peaks form, then gently fold it into the cheesecake mixture.
How to Avoid Lumps and Ensure a Light Texture
- Ensure cream cheese is fully softened before mixing.
- Use a hand or stand mixer to blend until smooth, avoiding overmixing.
- Using high-quality whipping cream is key—check out this guide on the best whipping cream for desserts from Food Network.
4. Assembling the Layers
This step is where the magic happens.
Pouring and Spreading Techniques for Even Layers
- Gently spoon the cheesecake filling over the firm chocolate layer, spreading it evenly with a spatula.
- Tap the pan lightly on the counter to remove any air bubbles.
How to Ensure Caramel Doesn’t Sink Into the Cheesecake
- Use 1 cup of thick caramel sauce and slowly drizzle it over the cheesecake layer.
- Spread gently with a spatula to keep it evenly distributed.
5. Final Chocolate Drizzle (Optional but Recommended!)
For the ultimate Twix-inspired look, a chocolate drizzle is the perfect finishing touch.
Best Way to Drizzle for a Beautiful Presentation
- Melt additional chocolate chips with a splash of heavy cream until smooth.
- Use a spoon or piping bag to drizzle over the top, letting some drip elegantly down the sides.
Now, all that’s left to do is chill for at least 4 hours before slicing into this rich, indulgent No-Bake Twix Cheesecake.
Chilling, Serving & Extra Tips for No-Bake Twix Cheesecake
A No-Bake Twix Cheesecake is all about achieving the perfect creamy texture with distinct layers of chocolate, caramel, and cheesecake. The way you chill, slice, and serve this dessert plays a crucial role in making it look and taste its best.
6. Chilling and Setting Time
Why Refrigeration Time is Crucial for the Perfect Consistency
The key to a firm, sliceable cheesecake is proper chilling. Since this is a no-bake cheesecake, the structure comes from the combination of cream cheese, whipped cream, and melted chocolate. Chilling allows these ingredients to:
- Firm up gradually, ensuring the layers don’t collapse when slicing.
- Develop deeper flavors, making each bite more balanced.
- Hold its shape when served, preventing a runny texture.
How Long is Enough & How to Speed Up the Process
For the best texture, let the cheesecake chill for at least 4 hours, but overnight is ideal. If you’re in a hurry, here’s how to speed it up:
- Use the freezer: Chill in the freezer for 1-2 hours instead of refrigerating for 4-6 hours.
- Use gelatin (optional): If you need an even firmer texture faster, adding 1 teaspoon of unflavored gelatin (dissolved in warm water) to the cheesecake filling helps it set quicker.
- Chill the pan beforehand: Placing the springform pan in the fridge for 15 minutes before assembly helps cool the layers faster.
For more insight on achieving the perfect creamy texture, check out this guide to whipping cream from Food Network, which ensures your cheesecake filling stays light and airy. Looking for another no-fuss cheesecake recipe? Try this No-Bake Peppermint Cheesecake for a refreshing twist on the classic.
7. How to Slice and Serve Like a Pro
After all the effort you put into making your cheesecake look perfect, the last thing you want is messy, uneven slices. Follow these expert tips to serve a picture-perfect cheesecake every time.
Tips for Clean Slicing
- Use a warm knife: Dip a sharp knife in hot water, wipe it dry, and make a clean cut. Repeat for each slice.
- Wipe between cuts: Caramel and chocolate layers can stick to the knife, so always wipe the blade clean after each slice.
- Cut with confidence: Use a gentle sawing motion rather than pressing down too hard to prevent squishing the layers.
Best Serving Temperatures for Flavor & Texture
- Chilled, but not too cold: Let the cheesecake sit at room temperature for 10-15 minutes before serving for the best consistency.
- Not frozen solid: If stored in the freezer, thaw in the fridge for 30-40 minutes before slicing.
- Soft caramel trick: If the caramel layer is too firm after refrigeration, warm your knife slightly before cutting to glide through effortlessly.
If you’re using homemade caramel sauce, check out this easy caramel recipe from Allrecipes to ensure a smooth and pourable consistency.
Creative Plating Ideas for an Instagram-Worthy Dessert
Presentation is everything, especially if you want to wow your guests or share your cheesecake on social media. Here are some plating ideas:
- Drizzle extra caramel or melted chocolate over each slice for a gourmet look.
- Top with crushed Twix bars for added crunch and a fun touch.
- Use fresh berries like raspberries or strawberries to contrast the richness.
- Dust with cocoa powder or sprinkle with sea salt for extra flavor depth.
- Serve with a scoop of vanilla ice cream or whipped cream for an indulgent pairing.
By following these chilling, slicing, and serving techniques, your No-Bake Twix Cheesecake will look just as incredible as it tastes.
How to Slice and Serve Like a Pro
A beautifully layered No-Bake Twix Cheesecake deserves to be served with clean, precise slices and a presentation that makes it even more irresistible. Follow these expert tips to make every serving picture-perfect.
Tips for Clean Slicing
Cutting a no-bake cheesecake can be tricky if the layers stick to the knife. Here’s how to get clean, sharp slices every time:
- Use a warm knife: Run a sharp knife under hot water, then dry it before each cut. The warmth helps glide through the chocolate and caramel layers.
- Wipe between cuts: Chocolate and caramel can stick to the blade, creating messy slices. Wipe the knife clean with a paper towel after each cut.
- Chill for the perfect consistency: The cheesecake should be firm but not frozen—around 4-6 hours of refrigeration is ideal.
For more tips on keeping desserts looking flawless, check out this guide on slicing cheesecakes perfectly from Serious Eats.
Best Serving Temperature for Flavor and Texture
No-bake cheesecakes taste best when slightly chilled but not too cold.
- Take it out of the fridge 10-15 minutes before serving for a creamy, smooth texture.
- If refrigerated for longer than 24 hours, let it sit at room temperature for 20 minutes to soften the caramel and ganache slightly.
- Avoid freezing before serving, as this can make the texture too firm and difficult to cut.
For those who love whipped cream on top, using a high-quality cream makes all the difference. Check out this resource on the best whipping creams from Food Network.
Creative Plating Ideas for an Instagram-Worthy Dessert
A little effort in plating can make your cheesecake look bakery-worthy.
- Drizzle extra caramel and chocolate over the plate before adding the slice.
- Garnish with crushed Twix bars or a sprinkle of sea salt for contrast.
- Add a dollop of whipped cream and a chocolate curl for a sophisticated finish.
- Use a dark-colored plate to make the layers pop in photos.
With these tips, your No-Bake Twix Cheesecake will not only taste amazing but also look stunning on any dessert table.
Storage & Make-Ahead Tips
A No-Bake Twix Cheesecake is best enjoyed fresh, but with the right storage methods, you can keep it tasting just as delicious for days. For more delicious and easy-to-make desserts, this Key Lime Pie Lush Recipe – The Ultimate No-Bake Dessert is another excellent choice!
How Long Does It Stay Fresh?
- In the fridge: The cheesecake stays fresh for up to 5 days when stored in an airtight container or wrapped tightly in plastic wrap.
- At room temperature: Avoid leaving it out for more than 1-2 hours, especially in warm weather, as the layers may soften too much.
Best Ways to Freeze and Thaw Without Ruining Texture
- Freezing: Wrap the cheesecake (whole or slices) in plastic wrap and aluminum foil, then store in an airtight container for up to 3 months.
- Thawing: Move it to the fridge overnight before serving. Avoid microwaving or letting it sit at room temperature for too long, as this can cause separation in the layers.
For tips on keeping whipped cream stable, check out this guide on the best whipping creams from Food Network.
How to Prep Ahead for Parties
- Make it 1-2 days in advance and store it in the fridge until serving.
- Assemble the layers but hold off on the chocolate drizzle—add it just before serving for a glossy finish.
- Slice ahead of time and arrange slices on a tray for easy serving.
Creative Variations & Additions
Want to put your own twist on this No-Bake Twix Cheesecake? Here are some creative variations to customize it to your taste.
Swap the Crust for a Unique Base
While a graham cracker crust is classic, try these alternatives for a different flavor profile:
- Oreo Crust: Adds a rich, chocolatey base that pairs perfectly with the caramel and cheesecake layers.
- Shortbread Crust: A buttery, melt-in-your-mouth option that enhances the Twix-inspired flavors.
- Gluten-Free Crust: Use gluten-free graham crackers or blended nuts for a celiac-friendly alternative.
Add a Peanut Butter Swirl for a Snickers-Inspired Version
- Swirl melted peanut butter into the cheesecake filling before chilling.
- Top with chopped peanuts for extra crunch.
For more on making smooth, creamy peanut butter swirls, check out this expert chocolate melting guide from Serious Eats.
Use White Chocolate Instead of Dark for a Unique Twist
- Replace the chocolate layer with melted white chocolate for a sweeter, creamier contrast.
- Drizzle caramel and white chocolate together for an eye-catching effect.
Top with Crushed Twix Bars for Extra Crunch
- Chop up mini Twix bars and sprinkle them over the cheesecake before serving.
- Add a final caramel drizzle for extra indulgence.
With these fun variations, you can turn this cheesecake into a completely new dessert every time you make it.
Creative Variations & Additions
A No-Bake Twix Cheesecake is already indulgent, but with a few creative tweaks, you can customize it to fit your taste. Whether you prefer a different crust, a peanut butter twist, or an extra chocolatey finish, these variations will take your cheesecake to the next level.
1. Swap the Crust for a Unique Base
While the classic graham cracker crust is delicious, try these alternatives for a different texture and flavor:
- Oreo Crust: Crush Oreo cookies (with filling) and mix with melted butter for a rich, chocolatey base.
- Shortbread Crust: Use buttery shortbread cookies to enhance the Twix-inspired flavors.
- Gluten-Free Crust: Swap graham crackers for a blend of crushed almonds and gluten-free biscuits for a celiac-friendly option.
For more ideas on crust variations, check out this guide on the best cheesecake bases from Serious Eats.
2. Add a Peanut Butter Swirl for a Snickers-Inspired Version
If you love Snickers bars, adding creamy peanut butter to this cheesecake is a game-changer.
- Melt ¼ cup peanut butter and drizzle it into the cheesecake filling before chilling.
- Swirl gently with a toothpick to create a marbled effect.
- Top with chopped peanuts for extra crunch.
Pair this with a dark chocolate drizzle to balance the sweetness. For tips on melting chocolate for the perfect drizzle, check out this expert guide from Food Network.
3. Use White Chocolate Instead of Dark for a Unique Twist
For a sweeter, creamier take, replace the chocolate layer with melted white chocolate:
- Melt 1 cup of white chocolate chips and spread it over the crust.
- Drizzle extra white chocolate and caramel on top for contrast.
- Sprinkle with sea salt for a sweet-salty balance.
4. Top with Crushed Twix Bars for Extra Crunch
For the ultimate Twix experience, garnish with chopped mini Twix bars:
- Scatter pieces over the cheesecake just before serving.
- Add a final drizzle of caramel and chocolate for a bakery-style finish.
With these variations, you can create a new version of No-Bake Twix Cheesecake every time.
Common Mistakes & How to Avoid Them
Even with a simple recipe like No-Bake Twix Cheesecake, a few common pitfalls can affect the final result. Here’s how to fix the most frequent issues and ensure your cheesecake turns out perfect every time.
1. Cheesecake Not Setting Properly? Here’s Why
If your cheesecake is too soft or doesn’t hold its shape, consider these factors:
- Not enough chilling time – No-bake cheesecakes need at least 4-6 hours in the fridge, but overnight is best for a firm texture.
- Overmixing the filling – Beating the mixture too much can incorporate excess air, preventing it from setting.
- Using the wrong cream – Whipping cream must have at least 35% fat content to create a stable filling. Check out this guide on the best whipping creams for optimal results.
2. Crust Crumbling? Fix It with These Tips
A crumbly crust can make slicing difficult. To prevent this:
- Use enough butter – The ratio should be 2 cups of crumbs to ½ cup melted butter for the right consistency.
- Press it firmly – Use a measuring cup or flat spoon to pack it tightly into the pan.
- Chill before adding layers – Refrigerate for at least 10 minutes to help it set properly.
3. Chocolate Seizing Up? How to Prevent It
Melting chocolate incorrectly can cause it to seize and become grainy. To avoid this:
- Use low heat – Melt in 20-second intervals in the microwave, stirring each time.
- Add a bit of cream – This helps create a smooth, pourable ganache. Follow these expert chocolate melting tips to get it right.
4. Avoiding a Runny Caramel Layer
A too-thin caramel layer can mix into the cheesecake instead of sitting on top. Here’s how to fix it:
- Use thick caramel sauce – Homemade caramel or store-bought thick caramel works best.
- Chill the cheesecake first – Pour caramel over a firm cheesecake layer to prevent it from sinking.
By following these tips, your No-Bake Twix Cheesecake will turn out flawless every time.
FAQs: No-Bake Twix Cheesecake
Can I Make This Ahead of Time?
Yes! No-bake cheesecakes are perfect for making ahead. Prepare the cheesecake 1-2 days in advance and store it in the fridge. For the best presentation, wait to add the chocolate drizzle and Twix toppings until just before serving.
What If I Don’t Have a Springform Pan?
No problem! You can use:
- A deep dish pie pan (slices won’t be as clean but still delicious).
- A lined square or rectangular pan to make cheesecake bars.
- Individual ramekins or jars for a fun, single-serving option.
Can I Make This Cheesecake Gluten-Free?
Yes! Simply swap the graham cracker crust for:
- Gluten-free graham crackers or cookies.
- A nut-based crust made with ground almonds and melted butter.
For more crust ideas, check out this expert guide on cheesecake bases.
How Do I Store Leftovers?
- Fridge: Store in an airtight container for up to 5 days.
- Freezer: Wrap individual slices in plastic wrap and foil; freeze for up to 3 months.
For thawing tips, check out this resource on the best ways to store desserts.
Can I Use Store-Bought Caramel Instead of Homemade?
Yes, but choose a thick, high-quality caramel sauce. Store-bought caramel is convenient, but homemade caramel offers a richer, fresher taste.
Conclusion & Final Thoughts
This No-Bake Twix Cheesecake is the ultimate easy yet indulgent dessert, combining layers of chocolate, caramel, and creamy cheesecake in every bite. The no-bake process makes it simple, while the customizable options let you make it your own.
Feel free to experiment with different crusts, toppings, and flavors to create your perfect version. If you try this recipe, share your results and let us know your favorite variations!
Print
No-Bake Twix Cheesecake
- Prep Time: 20 minutes
- Cook Time: 4-6 hours
- Total Time: 4 hours 20 minutes
- Yield: 8-10 servings 1x
- Category: Dessert
- Method: No-Bake
- Cuisine: American
- Diet: Vegetarian
Description
A rich and creamy no-bake cheesecake inspired by Twix bars, featuring layers of graham cracker crust, chocolate, caramel, and cheesecake filling. Perfect for any occasion!
Ingredients
For the Crust
- 2 cups graham cracker crumbs
- ½ cup melted butter
For the Chocolate Layer
- 1 cup chocolate chips
- ½ cup heavy cream
For the Cheesecake Filling
- 2 cups cream cheese, softened
- ½ cup powdered sugar
- 1 tsp vanilla extract
- 1 cup whipped cream
For the Caramel Layer & Topping
- 1 cup caramel sauce
- Additional chocolate chips + cream for drizzle (optional)
Instructions
- Make the Crust: Mix graham cracker crumbs with melted butter. Press into a springform pan and chill for 10 minutes.
- Prepare the Chocolate Layer: Melt chocolate chips with heavy cream in the microwave in 20-second intervals, stirring in between. Spread over the chilled crust and refrigerate for 15-20 minutes.
- Make the Cheesecake Filling: Beat cream cheese, powdered sugar, and vanilla until smooth. Fold in whipped cream for a light texture.
- Assemble the Layers: Spread cheesecake filling over the chocolate layer. Pour caramel sauce on top and smooth it gently.
- Optional Drizzle: Melt additional chocolate and drizzle over the top.
- Chill & Serve: Refrigerate for at least 4-6 hours before slicing and serving.
Notes
- For a firmer cheesecake, chill overnight before slicing.
- Substitutions: Use Oreo crust, shortbread, or a gluten-free alternative.
- To make ahead: Store in the fridge for up to 5 days or freeze for up to 3 months.
- For a peanut butter twist: Swirl melted peanut butter into the filling before chilling.
Nutrition
- Calories: 480 kcal
- Sugar: 35g
- Sodium: 220mg
- Fat: 30g
- Saturated Fat: 18g
- Carbohydrates: 45g
- Fiber: 1g
- Protein: 6g
- Cholesterol: 75mg